Astro Blog記事の画像にキャプションを付ける
初稿:
- 6 min read -

記事概要
- 先日のBloggerからAstroへ移行した記事の別途詳細
※参考 - Blog移行記事
10年以上の期間お世話になったGoogle Bloggerに別れを告げ、この度AstroでBlogサイトを構築し移行した。Astroは静的サイトを手軽に開発できる軽量フレームワーク。無料のテンプレートをベースにカスタマイズを行った。それなりの作業ボリュームとなったので、詳細は別記事に分け、今回は移行作業全体をまとめる。
目的
- Astroで構築したBlogサイトの記事に、キャプション付きの画像を表示できるようにする
- 2つの方法についてまとめる
- remark pluginを使用
- markdown: ✅
- MDX: ✅
- componentを使用
- markdown: ❌
- MDX: ✅
- remark pluginを使用
- styleはTailwind CSSを使用する
用語説明
Astro とは?
Astroは、ブログやマーケティング、eコマースなど、コンテンツ駆動のウェブサイトを作成するためのウェブフレームワークです。Astroは、新しいフロントエンドアーキテクチャを開拓し、他のフレームワークと比較してJavaScriptのオーバーヘッドと複雑さを低減することで知られています。高速でSEOに優れたウェブサイトが必要なら、Astroが最適です。 — Astro公式Docs より引用をDeepLで翻訳
MDX とは?
MDXでは、マークダウン・コンテンツでJSXを使用することができます。インタラクティブなチャートやアラートなどのコンポーネントをインポートして、コンテンツに埋め込むことができます。これにより、コンポーネントを使った長文のコンテンツ作成が簡単になります。 — What is MDX? | MDXより引用
作業環境
- OS - Ubuntu-22.04LTS on WSL2
- Node.js - v20.14.0
- pnpm - v9.4.0
- Astro - v4.11.3
- Tailwind CSS - v3.4.4
作業詳細
remark pluginを使用する
- 対応ファイルフォーマット
- markdown: ✅
- MDX: ✅
- メリット
- 簡単な作業で導入できる
- markdown・MDX両方に対応
- デメリット
- 特にない
- astroの画像最適の設定がおまかせになるぐらい
実装作業
- 以下2つのremark pluginsをインストールする
$ pnpm add -D @microflash/remark-figure-caption remark-gfm- astro.config.mjsにプラグインを追加する
import { defineConfig } from 'astro/config'
import mdx from '@astrojs/mdx'
import tailwind from '@astrojs/tailwind'
import sitemap from '@astrojs/sitemap'
import remarkGfm from 'remark-gfm'
import remarkFigureCaption from '@microflash/remark-figure-caption'

// https://astro.build/config
export default defineConfig({
  site: 'https://example.com',
  integrations: [mdx(), sitemap()],
  markdown: {
    remarkPlugins: [remarkFigureCaption, remarkGfm]
  },
  integrations: [
    tailwind(),
    mdx({
      syntaxHighlight: false,
      drafts: true
    })
  ]
})
使用方法
- markdown、MDXどちらも以下のように記述するとaltのテキストがキャプションとして表示される
---
title: '画像キャプションのテスト記事'
description: 'remarkプラグインを使って画像にキャプションを付ける'
pubDate: 'Jul 19 2024'
heroImage: '/blog-placeholder-3.jpg'
---
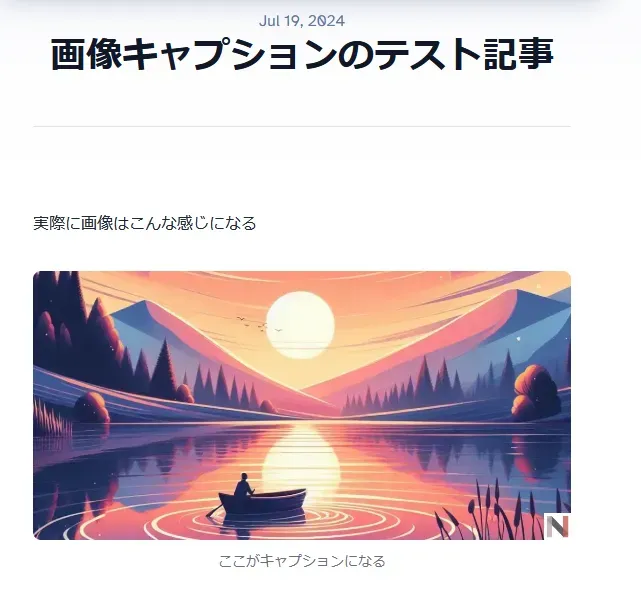
実際に画像はこんな感じになる
componentを使用
- 対応ファイルフォーマット
- markdown: ❌
- MDX: ✅
- メリット
- キャプションにアンカーリンクを入れることができる
- astro:assetsの画像最適化を自由に設定できる
- デメリット
- markdown非対応
実装作業
- キャプション付き画像用のcomponentを作成する
- set:htmlはキャプションにankerタグを使えるようにするため
---
import { Image } from 'astro:assets'

const { title, src, alt } = Astro.props
---

<figure class='w-fit'>
  <Image src={src} alt={alt} format='webp' />
  {
    /* eslint-disable astro/no-set-html-directive */
    title && (
      <figcaption class='mt-4 text-center text-sm text-gray-700 dark:text-gray-300 md:mt-2'>
        <Fragment set:html={title} />
      </figcaption>
    )
    /* eslint-enable astro/no-set-html-directive */
  }
</figure>- […slug].astroに作成したcomponentを追加する
---
import { type CollectionEntry, getCollection } from 'astro:content'
import BlogPost from '../../layouts/BlogPost.astro'
import BlogImage from '../../components/BlogImage.astro'

export async function getStaticPaths() {
  const posts = await getCollection('blog')
  return posts.map((post: any) => ({
    params: { slug: post.slug },
    props: post
  }))
}
type Props = CollectionEntry<'blog'>

const post = Astro.props
const { Content } = await post.render()
---

<BlogPost {...post.data}>
  <Content />
  <Content components={{ img: BlogImage }} />
</BlogPost>
使用方法
- MDXファイルで以下のように記述すると画像URLの後ろにクォーテーションで囲ったテキストがキャプションとして表示される
---
title: '画像キャプションのテスト記事'
description: 'componentを使って画像にキャプションを付ける'
pubDate: 'Jul 19 2024'
heroImage: '/blog-placeholder-3.jpg'
---
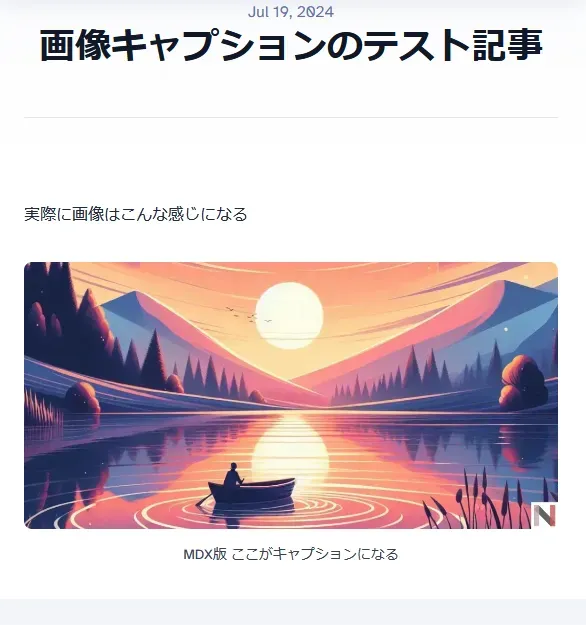
実際に画像はこんな感じになる
まとめ
- 2通りの実装をまとめたが、個人的にMDXで記事を書いていることもあり2つ目の方法を採用している
- 主な理由は以下のとおり
- キャプションで画像引用元をリンク付きで示したい場合がある
- altは必須だがキャプションを付けたくない場合もある
↓ 先ほどの画像キャプションにリンクを追加したもの
- 補足として、componentでastro:assetsのImage(画像最適化)を明示的に使用しているが、1つ目の実装でもloadingがlazy固定だったりするが最適化されていた
- markdownに今回作成したcomponentを対応させる方法もあると思うが、現時点では試していない
以上