Headless CMS「Front Matter CMS」を使う【VSCode拡張機能】
初稿:
- 11 min read -
記事概要
- 先日のBloggerからAstroへ移行した記事の別途詳細
- 今回のテーマはヘッドレスCMS(以降、Headless CMS)
- 導入した「Front Matter CMS」の機能や特徴についてまとめる
- 前提としてAstroで構築したBlogサイトへの導入であること
※参考 - Blog移行記事
10年以上の期間お世話になったGoogle Bloggerに別れを告げ、この度AstroでBlogサイトを構築し移行した。Astroは静的サイトを手軽に開発できる軽量フレームワーク。無料のテンプレートをベースにカスタマイズを行った。それなりの作業ボリュームとなったので、詳細は別記事に分け、今回は移行作業全体をまとめる。
環境
- VSCode - v1.90.2
- Front Matter CMS - v10.2.0
- Astro - v4.11.3
Fornt Matter CMSについて
Headless CMS right in your code editor | Front Matter
Headless CMS running in Visual Studio Code that helps managing your static sites. Supports Hugo, Jekyll, Docusaurus, NextJs, Gatsby, and more.
Visual Studio CodeやGitPodなどで動作するCMS、Front Matterで、両方の世界のベストを体験しましょう。Front MatterのCMS機能を導入して、静的ジェネレータのコンテンツをコントロールしましょう。複雑なセットアップは不要です。Front Matter CMS を選んで、今すぐ素晴らしいコンテンツの作成とプレビューを始めましょう。
— 公式サイトより引用をDeepLで翻訳
主な特徴
- 使い慣れたエディタにCMS機能をビルトインするイメージ
- ホスティングタイプのCMSと違いVSCodeの拡張機能として動作する
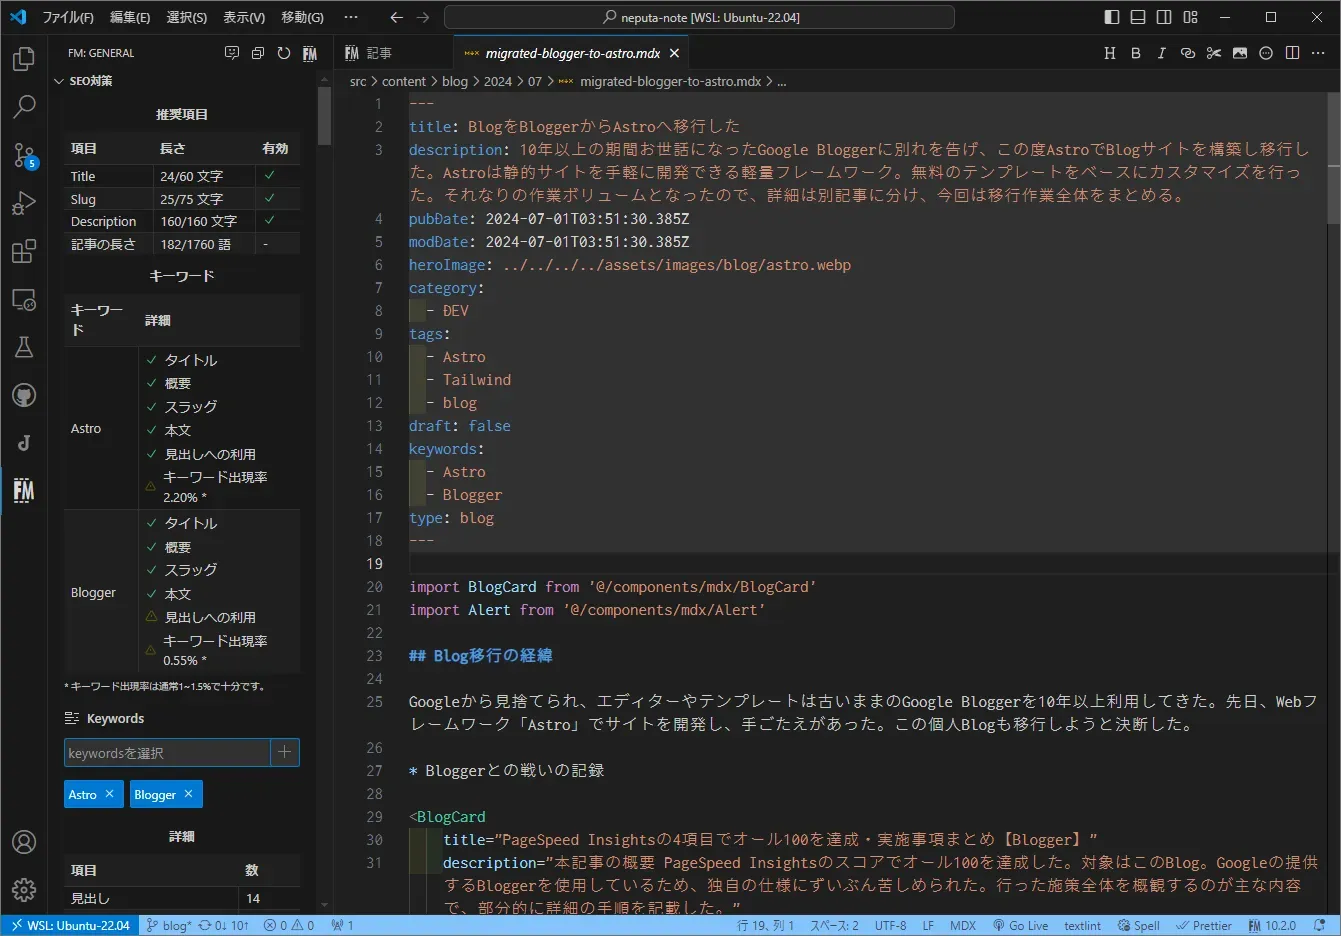
- VSCodeのエディタでmarkdownやMDXを書ける
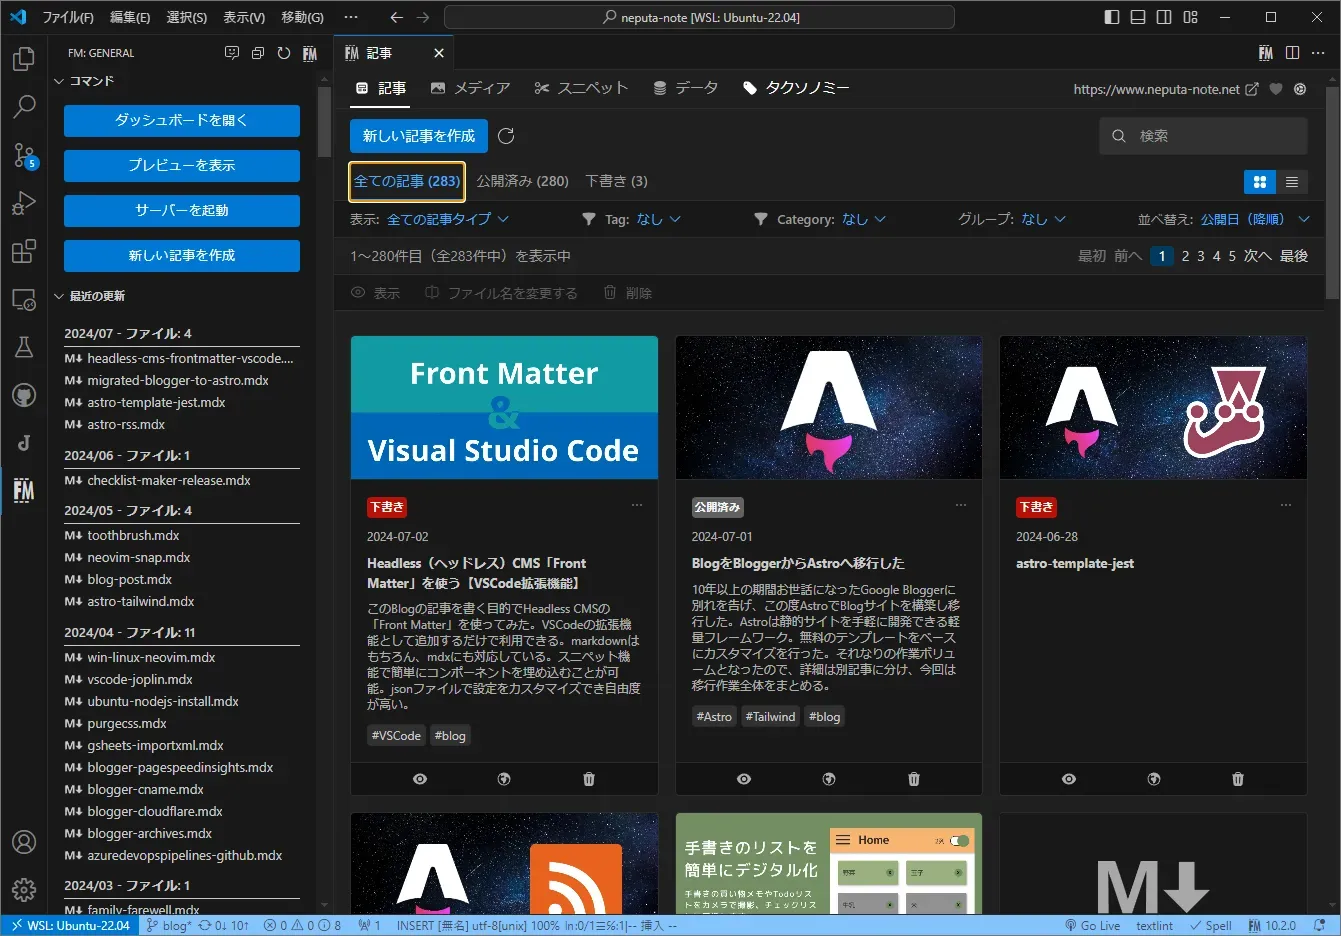
- VSCode上でダッシュボードやコントロールパネルを提供する
- 記事内容のキーワード使用率や文字数を計測するチェック機能搭載
利用者によるとは思うが、デメリットと思われる点も挙げておく
- ドキュメントが英語
- AIチャットで日本語による質問が可能(ただし遅い)
- オンライン利用ができない
- VSCode for the Webを試してみたがFront Matter CMSは動作対象外だった(2024/07/3時点)
決め手となったポイント
- 個人的にVSCode +「VSCode Neovim」が最も使いやすく拡張機能として組み込めること
- 設定ファイルfrontmatter.jsonを結構な自由度でカスタマイズできること
ドキュメントについて
公式ドキュメント
Getting started | Front Matter
Youtubeの説明動画
自動翻訳の日本語字幕で見たが、それなりに理解できた。
参考サイト
公式ドキュメントは全て英語だが、基本的な設定方法を日本語でまとめている記事があり助かった。
- Front Matter CMS + VSCode + Astro が快適なので布教したい | NERD
- VS Codeで動く拡張機能ヘッドレスCMS、Front Matter CMSを知って欲しい - Route360
- VSCodeのFront Matter CMSでZennの記事を管理しよう
導入作業
インストール
- VSCodeでインストールする場合は「Front Matter CMS」で検索(作者はElio Struyf)
- Marketplaceはこちら Front Matter CMS - Visual Studio Marketplace
初期設定 frontmatter.json作成
- 初期設定をガイドするGUIも用意されている
- 今回はfrontmatter.jsonを直接編集し設定を行った
サイトの基本情報
- 以下は自動で設定してくれた
{
"$schema": "https://frontmatter.codes/frontmatter.schema.json",
"frontMatter.framework.id": "astro",
"frontMatter.preview.host": "http://localhost:XXXX",
"frontMatter.website.host": "https://www.neputa-note.net"
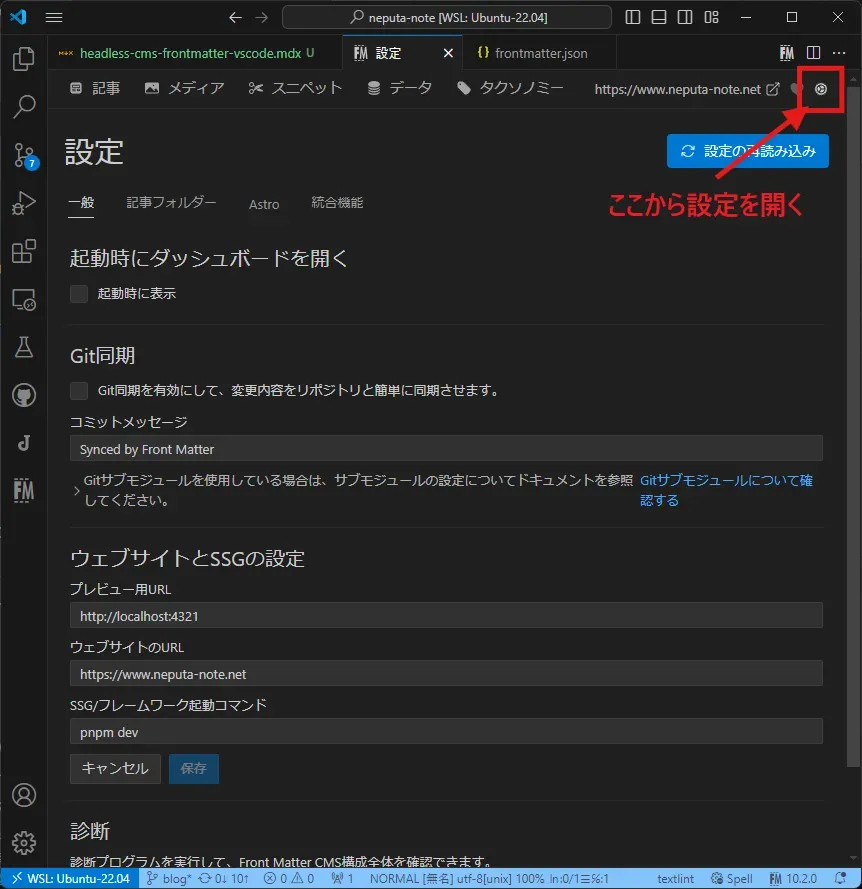
}プレビューの設定
- プレビューを表示するコマンドを設定
- このブログはURL末尾にスラッシュが必要のためtrailingSlashをtrue
{
  "frontMatter.framework.startCommand": "pnpm dev",
  "frontMatter.preview.pathName": "/",
  "frontMatter.preview.trailingSlash": true
}
アセットのパス
- 画像はassetsディレクトリに配置している
- 相対パスを使う場合はrelativeをtrueに
{
  "frontMatter.content.publicFolder": {
    "path": "src/assets",
    "relative": true
  }
}
ディレクトリとプレビューのパス
- Placeholderの仕様
- このブログのページは「記事」と「それ以外(自己紹介や問い合わせフォーム等)」の2種類
- 記事を「Blog」、それ以外を「Page」として定義する
Blog(ブログ記事)
- Astroはディレクトリ構造をそのままURIパスに反映する
- ブログ記事のディレクトリ構造はsrc/content/blog/yyyy/MM/filename
- ワイルドカードを使ったらうまくいった
- previewPathのpathTokenは、pathに指定したworkspaceを0とし「n番目のパス」として利用するもの(ここではyear:4番目、month:5番目)
  "frontMatter.content.pageFolders": [
    {
      "title": "Blog",
      "path": "[[workspace]]/src/content/blog/**/**/*.mdx",
      "previewPath": "/{{pathToken.4}}/{{pathToken.5}}",
      "trailingSlash": true,
      "contentTypes": ["blog"]
    }
]Page(それ以外のページ)
- ディレクトリ「src/pages/p」に保存している
{
  "frontMatter.content.pageFolders": [
    {
      "title": "Page",
      "path": "[[workspace]]/src/pages/p",
      "trailingSlash": true,
      "previewPath": "/p",
      "contentTypes": ["page"]
    }
  ]
}
frontmatter定義
- 公式ドキュメント:Settings overview | Front Matter
- BlogおよびPageそれぞれのfrontmatterを定義する
- 定義はfrontMatter.taxonomy.contentTypesに記述する
- frontMatter.taxonomy.contentTypesの構造はヘッダと項目
Blog(ブログ記事)
- pageBundleは仕組みが理解できていないのでfalse
- templateについては後述する
- fileTypeはMDXを使用するので指定した
- filePrefixは例えば”yyyy-MM”としておくと、ダッシュボードの「新しい記事を作成」使用時にprefixを自動で付けてくれる
- fieldsにfrontmatterの項目を定義する
- Astroの方が融通が利くのでFront Matter CMSに合わせる方向で定義した
- typeのcategoriesとtagsはFront Matter CMS固有の型
- 一括編集やマージなど便利機能が使える
{
  "frontMatter.taxonomy.contentTypes": [
    {
      "name": "blog",
      "pageBundle": false,
      "template": "[[workspace]]/.frontmatter/templates/template-base.mdx",
      "fileType": "mdx",
      "filePrefix": null,
      "fields": [
        {
          "title": "Title",
          "name": "title",
          "type": "string",
          "single": true
        },
        {
          "title": "Description",
          "name": "description",
          "type": "string"
        },
        {
          "title": "Publishing date",
          "name": "pubDate",
          "type": "datetime",
          "default": "{{now}}",
          "isPublishDate": true
        },
        {
          "title": "Modified date",
          "name": "modDate",
          "type": "datetime",
          "default": "{{now}}"
        },
        {
          "title": "Content preview",
          "name": "heroImage",
          "type": "image",
          "isPreviewImage": true
        },
        {
          "title": "Category",
          "name": "category",
          "type": "categories",
          "multiple": false
        },
        {
          "title": "Tags",
          "name": "tags",
          "type": "tags"
        },
        {
          "title": "Draft",
          "name": "draft",
          "type": "draft"
        }
      ]
    }
  ]
}
Page(それ以外のページ)
- PageはBlogと異なるレイアウトをAstro上で使用するため項目を追加
- あとはBlogをベースに不要項目を削った構成
{
  "frontMatter.taxonomy.contentTypes": [
    {
      "name": "page",
      "pageBundle": false,
      "fileType": "mdx",
      "filePrefix": null,
      "fields": [
        {
          "title": "Layout",
          "name": "layout",
          "type": "string"
        },
        {
          "title": "Title",
          "name": "title",
          "type": "string",
          "single": true
        },
        {
          "title": "Description",
          "name": "description",
          "type": "string"
        },
        {
          "title": "Author",
          "name": "author",
          "type": "string"
        },
        {
          "title": "Publishing date",
          "name": "pubDate",
          "type": "datetime",
          "default": "{{now}}",
          "isPublishDate": true
        },
        {
          "title": "Modified date",
          "name": "modDate",
          "type": "datetime",
          "default": "{{now}}"
        },
        {
          "title": "Draft",
          "name": "draft",
          "type": "draft"
        }
      ]
    }
  ]
}
完成したfrontmatter.json
- 以上を反映し完成したforntmatter.jsonを示す
- 改善の余地は多々あると思う
- 仕様の理解が進み、特記すべき発見があれば追記するかも
{
  "$schema": "https://frontmatter.codes/frontmatter.schema.json",
  "frontMatter.framework.id": "astro",
  "frontMatter.preview.host": "http://localhost:4321",
  "frontMatter.website.host": "https://www.neputa-note.net",
  "frontMatter.framework.startCommand": "pnpm dev",
  "frontMatter.preview.pathName": "/",
  "frontMatter.preview.trailingSlash": true,
  "frontMatter.content.publicFolder": {
    "path": "src/assets",
    "relative": true
  },
  "frontMatter.content.pageFolders": [
    {
      "title": "Blog",
      "path": "[[workspace]]/src/content/blog/**/**/*.mdx",
      "previewPath": "/{{pathToken.4}}/{{pathToken.5}}",
      "trailingSlash": true,
      "contentTypes": ["blog"]
    },
    {
      "title": "Page",
      "path": "[[workspace]]/src/pages/p",
      "trailingSlash": true,
      "previewPath": "/p",
      "contentTypes": ["page"]
    }
  ],
  "frontMatter.taxonomy.contentTypes": [
    {
      "name": "page",
      "pageBundle": false,
      "fileType": "mdx",
      "filePrefix": null,
      "fields": [
        {
          "title": "Layout",
          "name": "layout",
          "type": "string"
        },
        {
          "title": "Title",
          "name": "title",
          "type": "string",
          "single": true
        },
        {
          "title": "Description",
          "name": "description",
          "type": "string"
        },
        {
          "title": "Author",
          "name": "author",
          "type": "string"
        },
        {
          "title": "Publishing date",
          "name": "pubDate",
          "type": "datetime",
          "default": "{{now}}",
          "isPublishDate": true
        },
        {
          "title": "Modified date",
          "name": "modDate",
          "type": "datetime",
          "default": "{{now}}"
        },
        {
          "title": "Draft",
          "name": "draft",
          "type": "draft"
        }
      ]
    },
    {
      "name": "blog",
      "pageBundle": false,
      "template": "[[workspace]]/.frontmatter/templates/template-base.mdx",
      "fileType": "mdx",
      "filePrefix": null,
      "fields": [
        {
          "title": "Title",
          "name": "title",
          "type": "string",
          "single": true
        },
        {
          "title": "Description",
          "name": "description",
          "type": "string"
        },
        {
          "title": "Publishing date",
          "name": "pubDate",
          "type": "datetime",
          "default": "{{now}}",
          "isPublishDate": true
        },
        {
          "title": "Modified date",
          "name": "modDate",
          "type": "datetime",
          "default": "{{now}}"
        },
        {
          "title": "Content preview",
          "name": "heroImage",
          "type": "image",
          "isPreviewImage": true
        },
        {
          "title": "Category",
          "name": "category",
          "type": "categories",
          "multiple": false
        },
        {
          "title": "Tags",
          "name": "tags",
          "type": "tags"
        },
        {
          "title": "Draft",
          "name": "draft",
          "type": "draft"
        }
      ]
    }
  ]
}
その他設定
Templateについて
Blogのtaxonomyに定義したテンプレートについて説明する
{
  "template": "[[workspace]]/.frontmatter/templates/template-base.mdx"
}- ダッシュボードの「新しい記事を作成」で、指定したテンプレートでファイルを作成してくれる
- 今回はデフォルトのheroImageと多用するコンポーネントを追加した
---
title: ''
description: ''
pubDate:
modDate:
heroImage: '../../../../assets/images/blog/default.webp'
category:
tags:
draft: true
keywords:
---

import BlogCard from '@/components/mdx/BlogCard'
import Alert from '@/components/mdx/Alert'
databaseについて
- プロジェクトルートの .frontmatterディレクトリにdatabaseというディレクトリがある
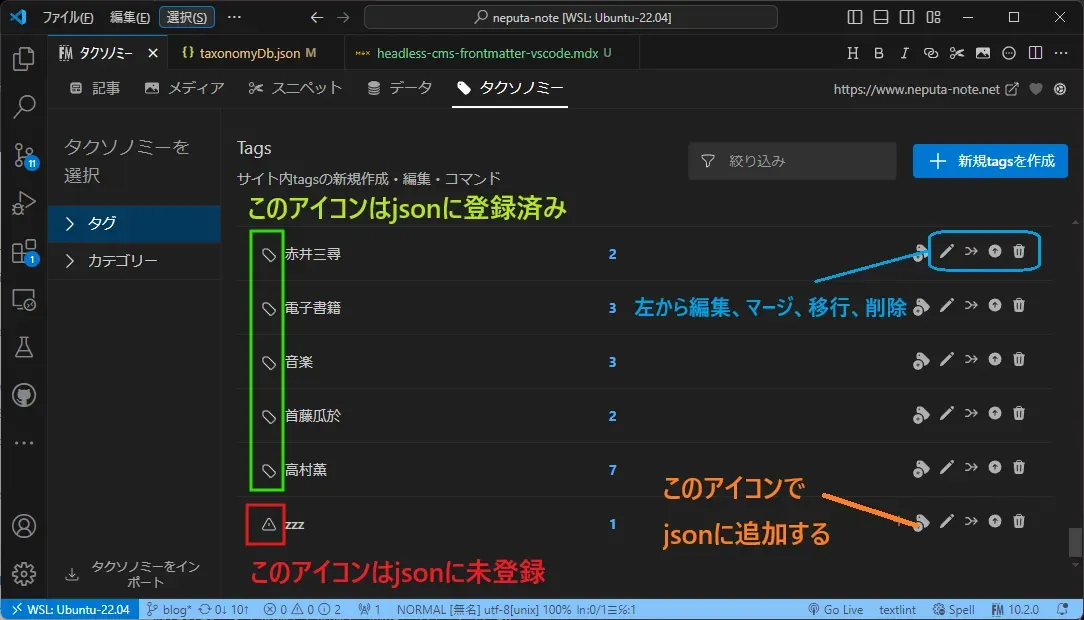
- これはFront Matter CMSで使用する記事以外のデータをjsonで管理する
- 例えばダッシュボードの「タクソノミー」はtagとcategoryはtaxonomyDb.jsonに格納される
- 格納されたデータはダッシュボードのフィルターで使えるようになる
- その他確認できたのは以下
- mediaDb.jsonは画像等メディアコンテンツを格納
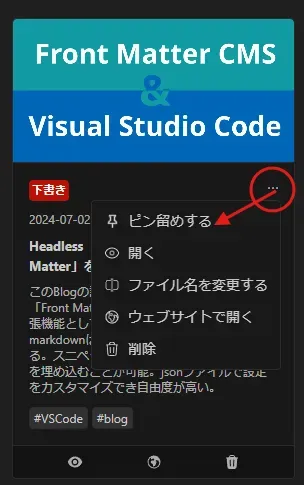
- pinnedItemsDb.jsonはピン止めした記事を格納
今後について
- スニペットとデータがまったく使いこなせていない
- 仕様を理解し使いこなせるようになったら追記するかもしれない。
まとめ
公式ドキュメントに詳しく書かれていなかった部分を中心に、実際行った設定をまとめてみた。
個人的にVSCodeを最も使いやすいエディタとして構築していたのでFront Matter CMSを知った時は迷わずこれだ!と思った。
実際導入し使ってみると画像・タグの管理、日付の更新など煩わしい作業から解放され、記事を書くことに集中できている。
感謝の気持ちを込め少額だが5ドルOne timeの寄付をさせてもらった。
非常に素晴らしいツールなので、興味を持たれた方はぜひ使ってみてほしい。
Headless CMS right in your code editor | Front Matter
Headless CMS running in Visual Studio Code that helps managing your static sites. Supports Hugo, Jekyll, Docusaurus, NextJs, Gatsby, and more.